Appearance
Easy Step-by-Step Walkthrough
We'll take up a step-by-step example in the following that demonstrates how:
- You can create an application in your account and obtain the application credentials,
- Import a video for AutoGraph distribution and figure out the corresponding FileID,
- Generate the uniquely watermarked downloads automatically with the
create_autograph.pyPython orcreate_autograph.phpPHP scripts.
So let's start...
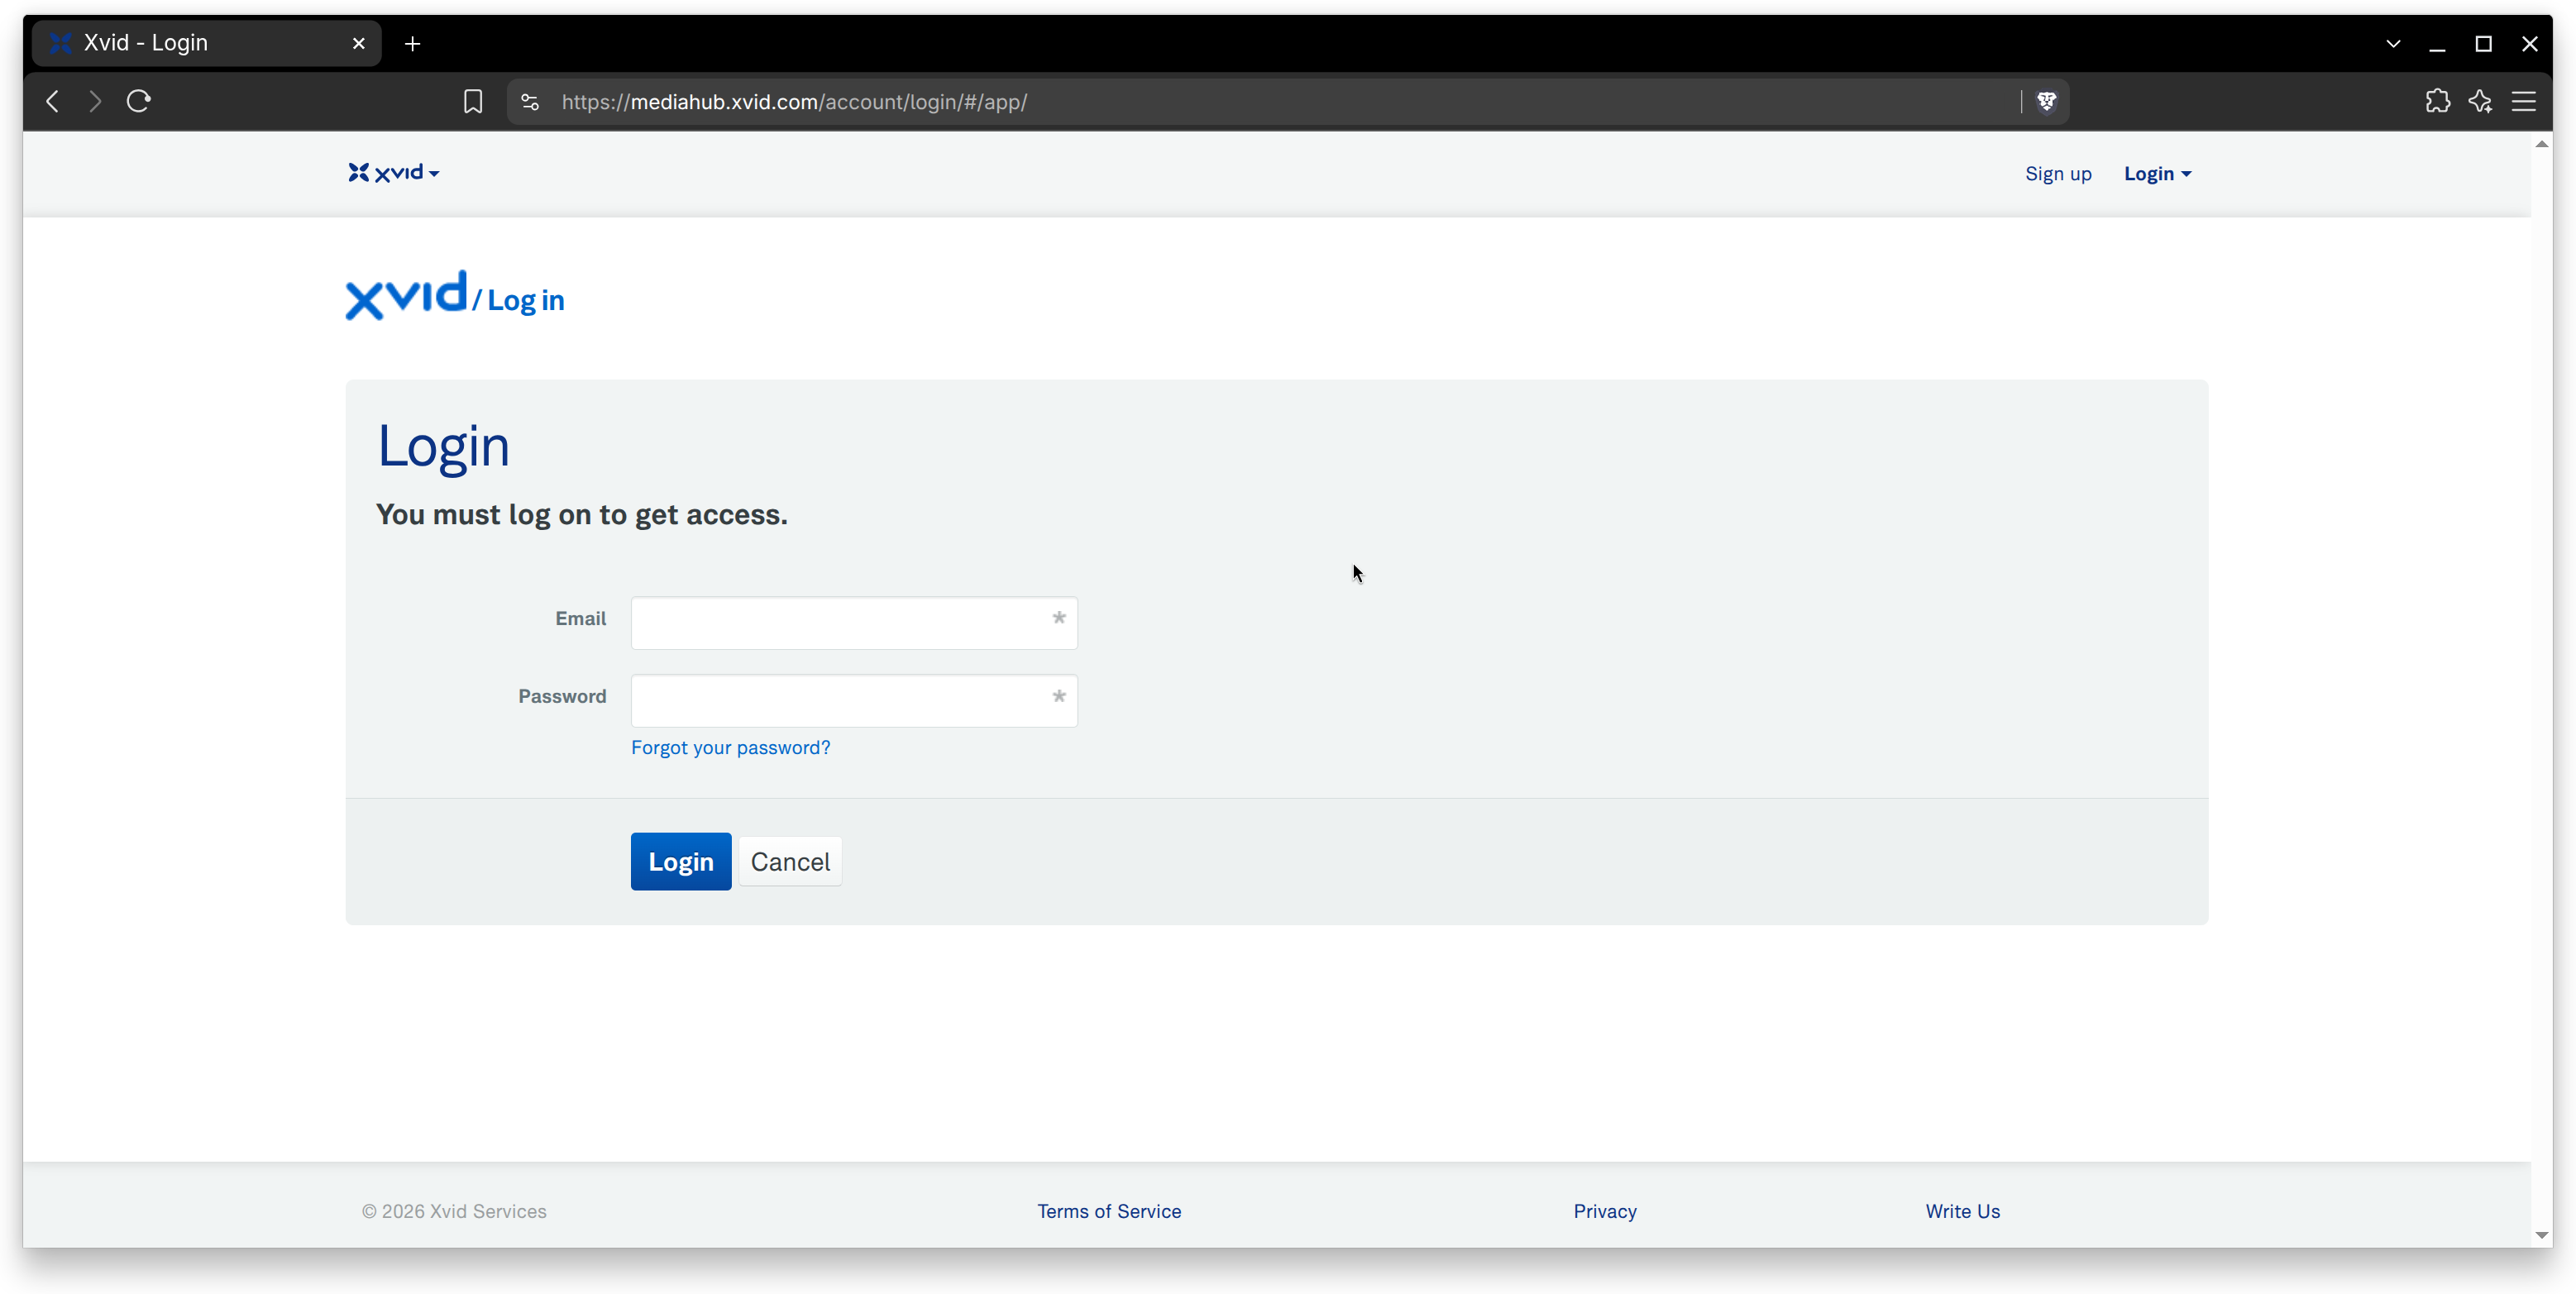
Step 1: Log in to the Xvid MediaHub Dashboard
https://mediahub.xvid.com/app/
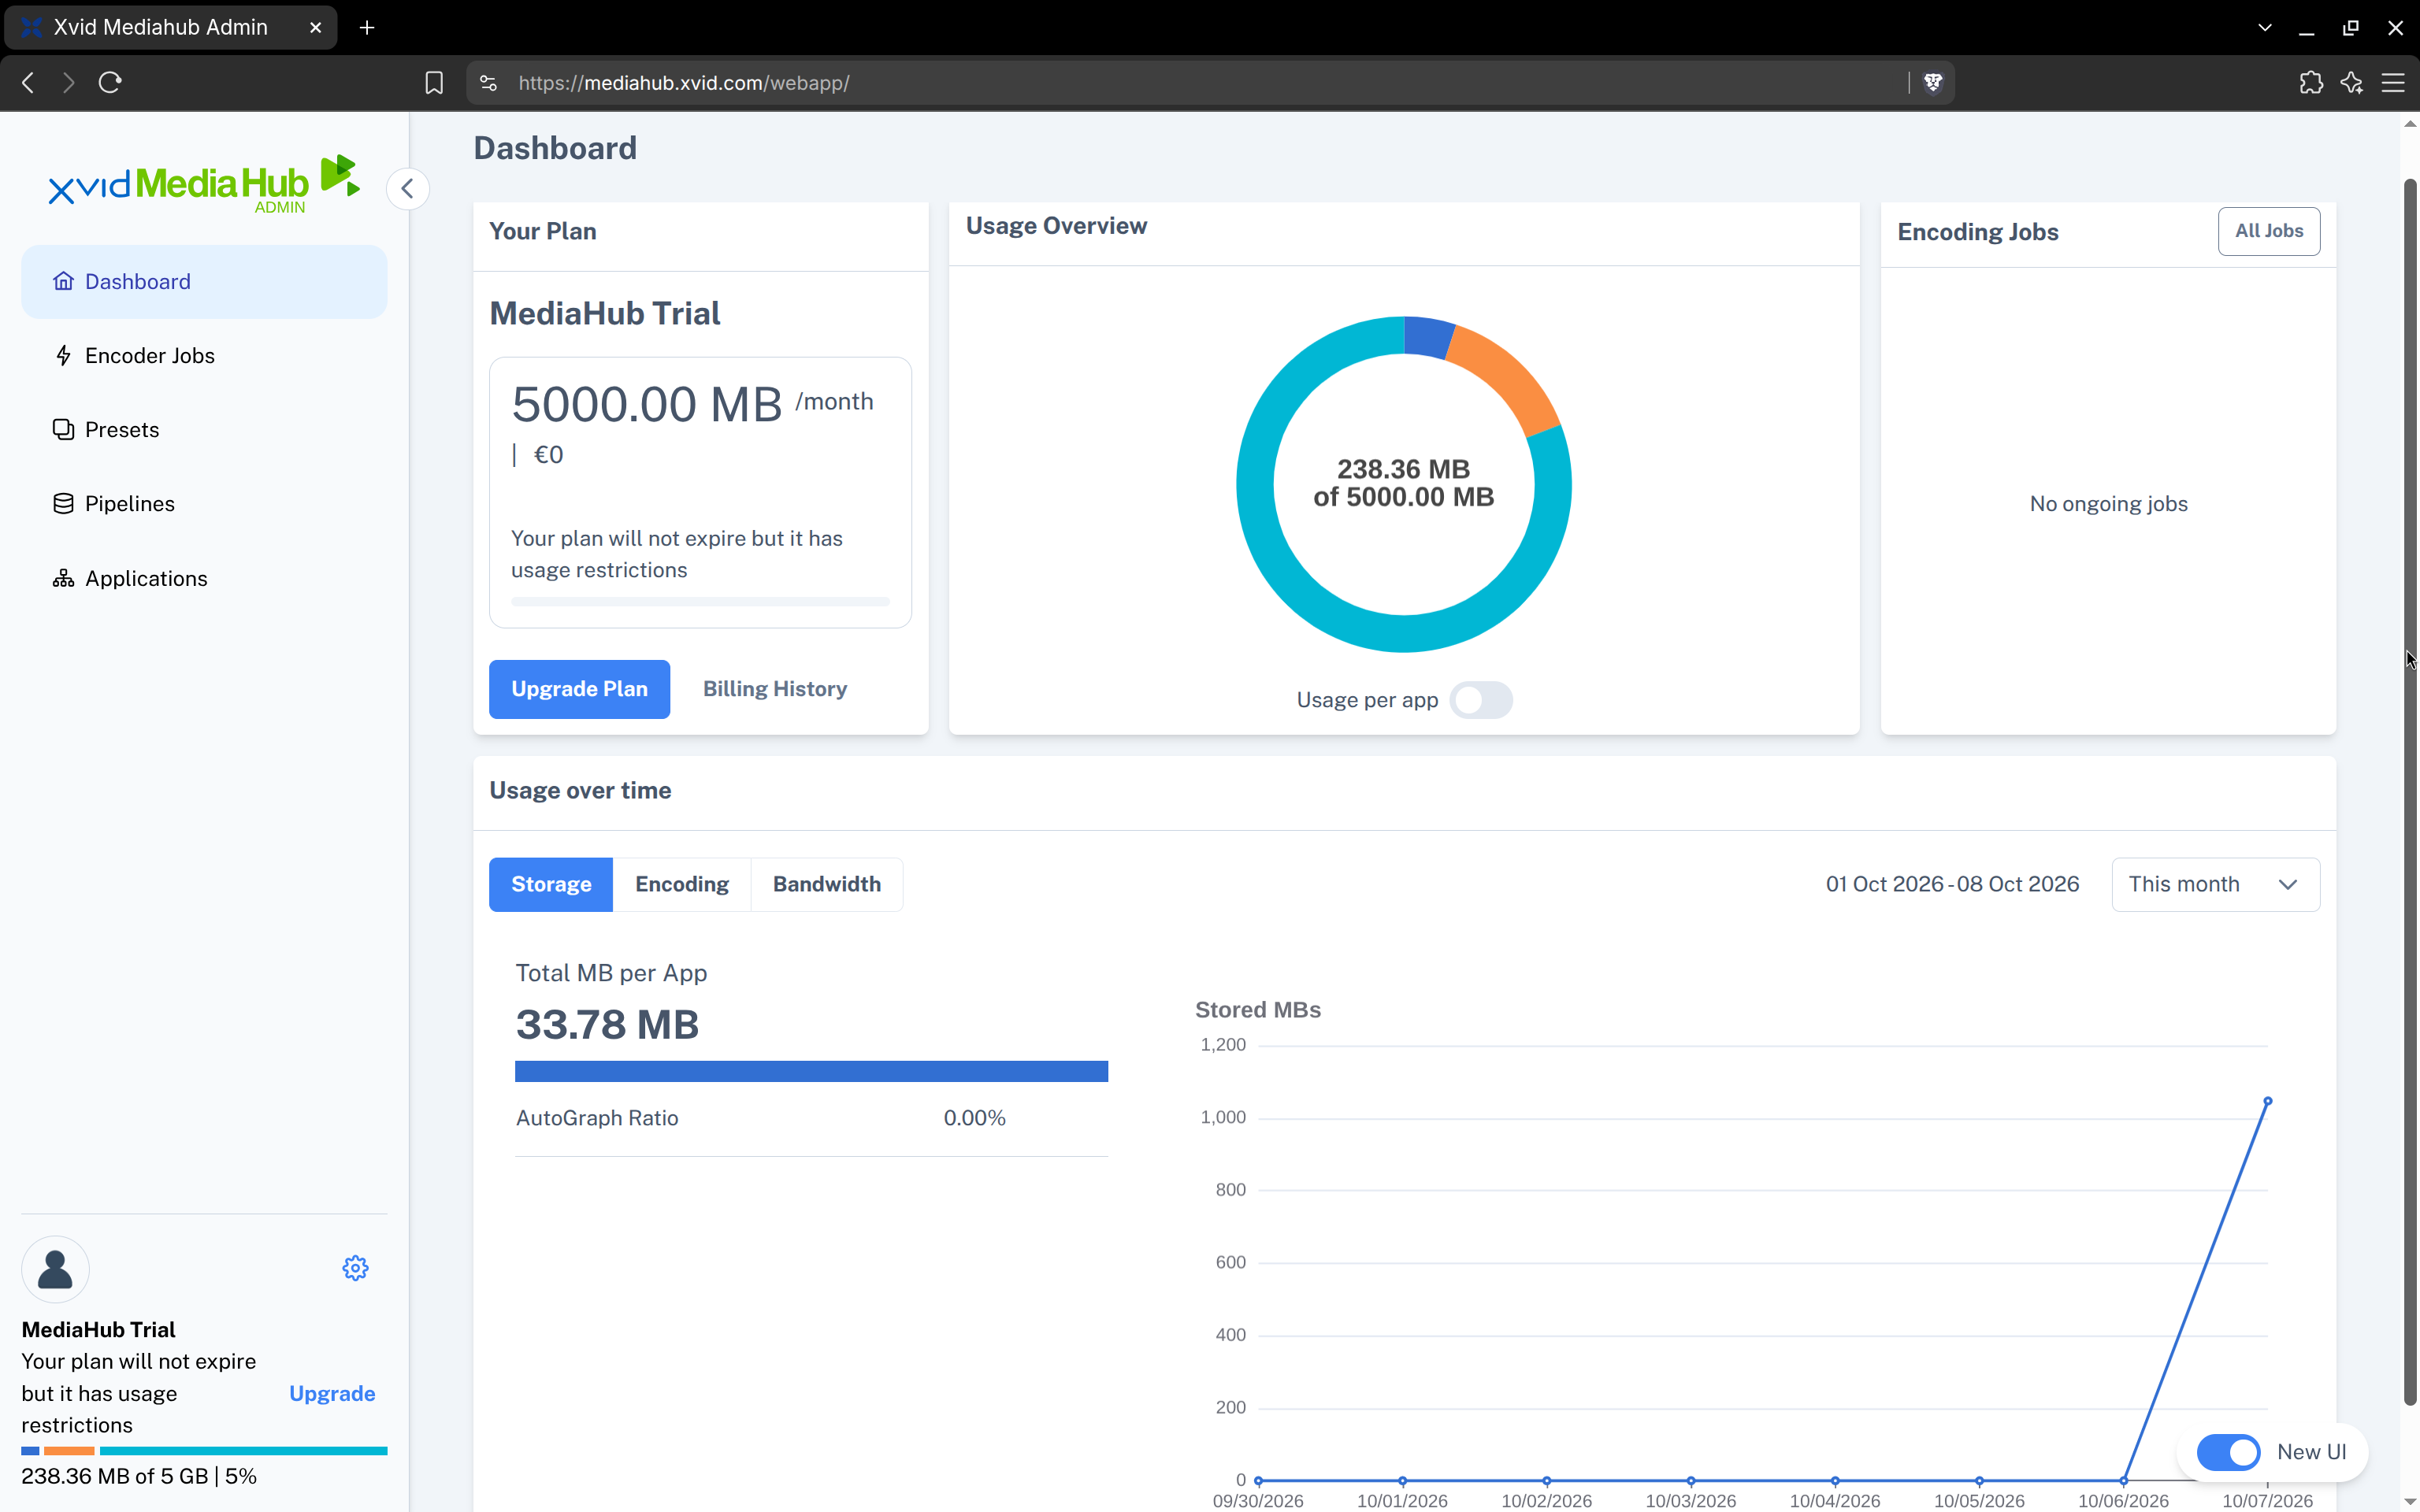
You will now see a dashboard with an overview. If you click "Encoder Jobs" you'll be shown a table with all videos you have imported so far into your account.
TIP
The demo/trial account has some restrictions regarding usage volumes, so it's better to test with shorter video titles (~30 minutes) and not several 3 hr movies, or you might run out of quota. (In case you do indeed run out of quota but are not yet done with your testing, just let us know and we can increase your quota...)
Step 2: Creating an Application
An application sets up a set of alternate "login" credentials, allowing you to delegate API access under your account to one (or more) applications (e.g. a script, your website, etc.). This way you don't need to leak your actual username and password into an application config file, and you can also at any time disable API access of a certain application or re-create the entire application with new credentials, in case an app got compromised or insecure, without harming your overall account or any other app in your account. Further, apps allow you to track your account usage (e.g. the download traffic) individually per application. So in case you have multiple websites, just create one app for each site, and it'll be easy to track video conversions or download traffic caused by each of your sites.
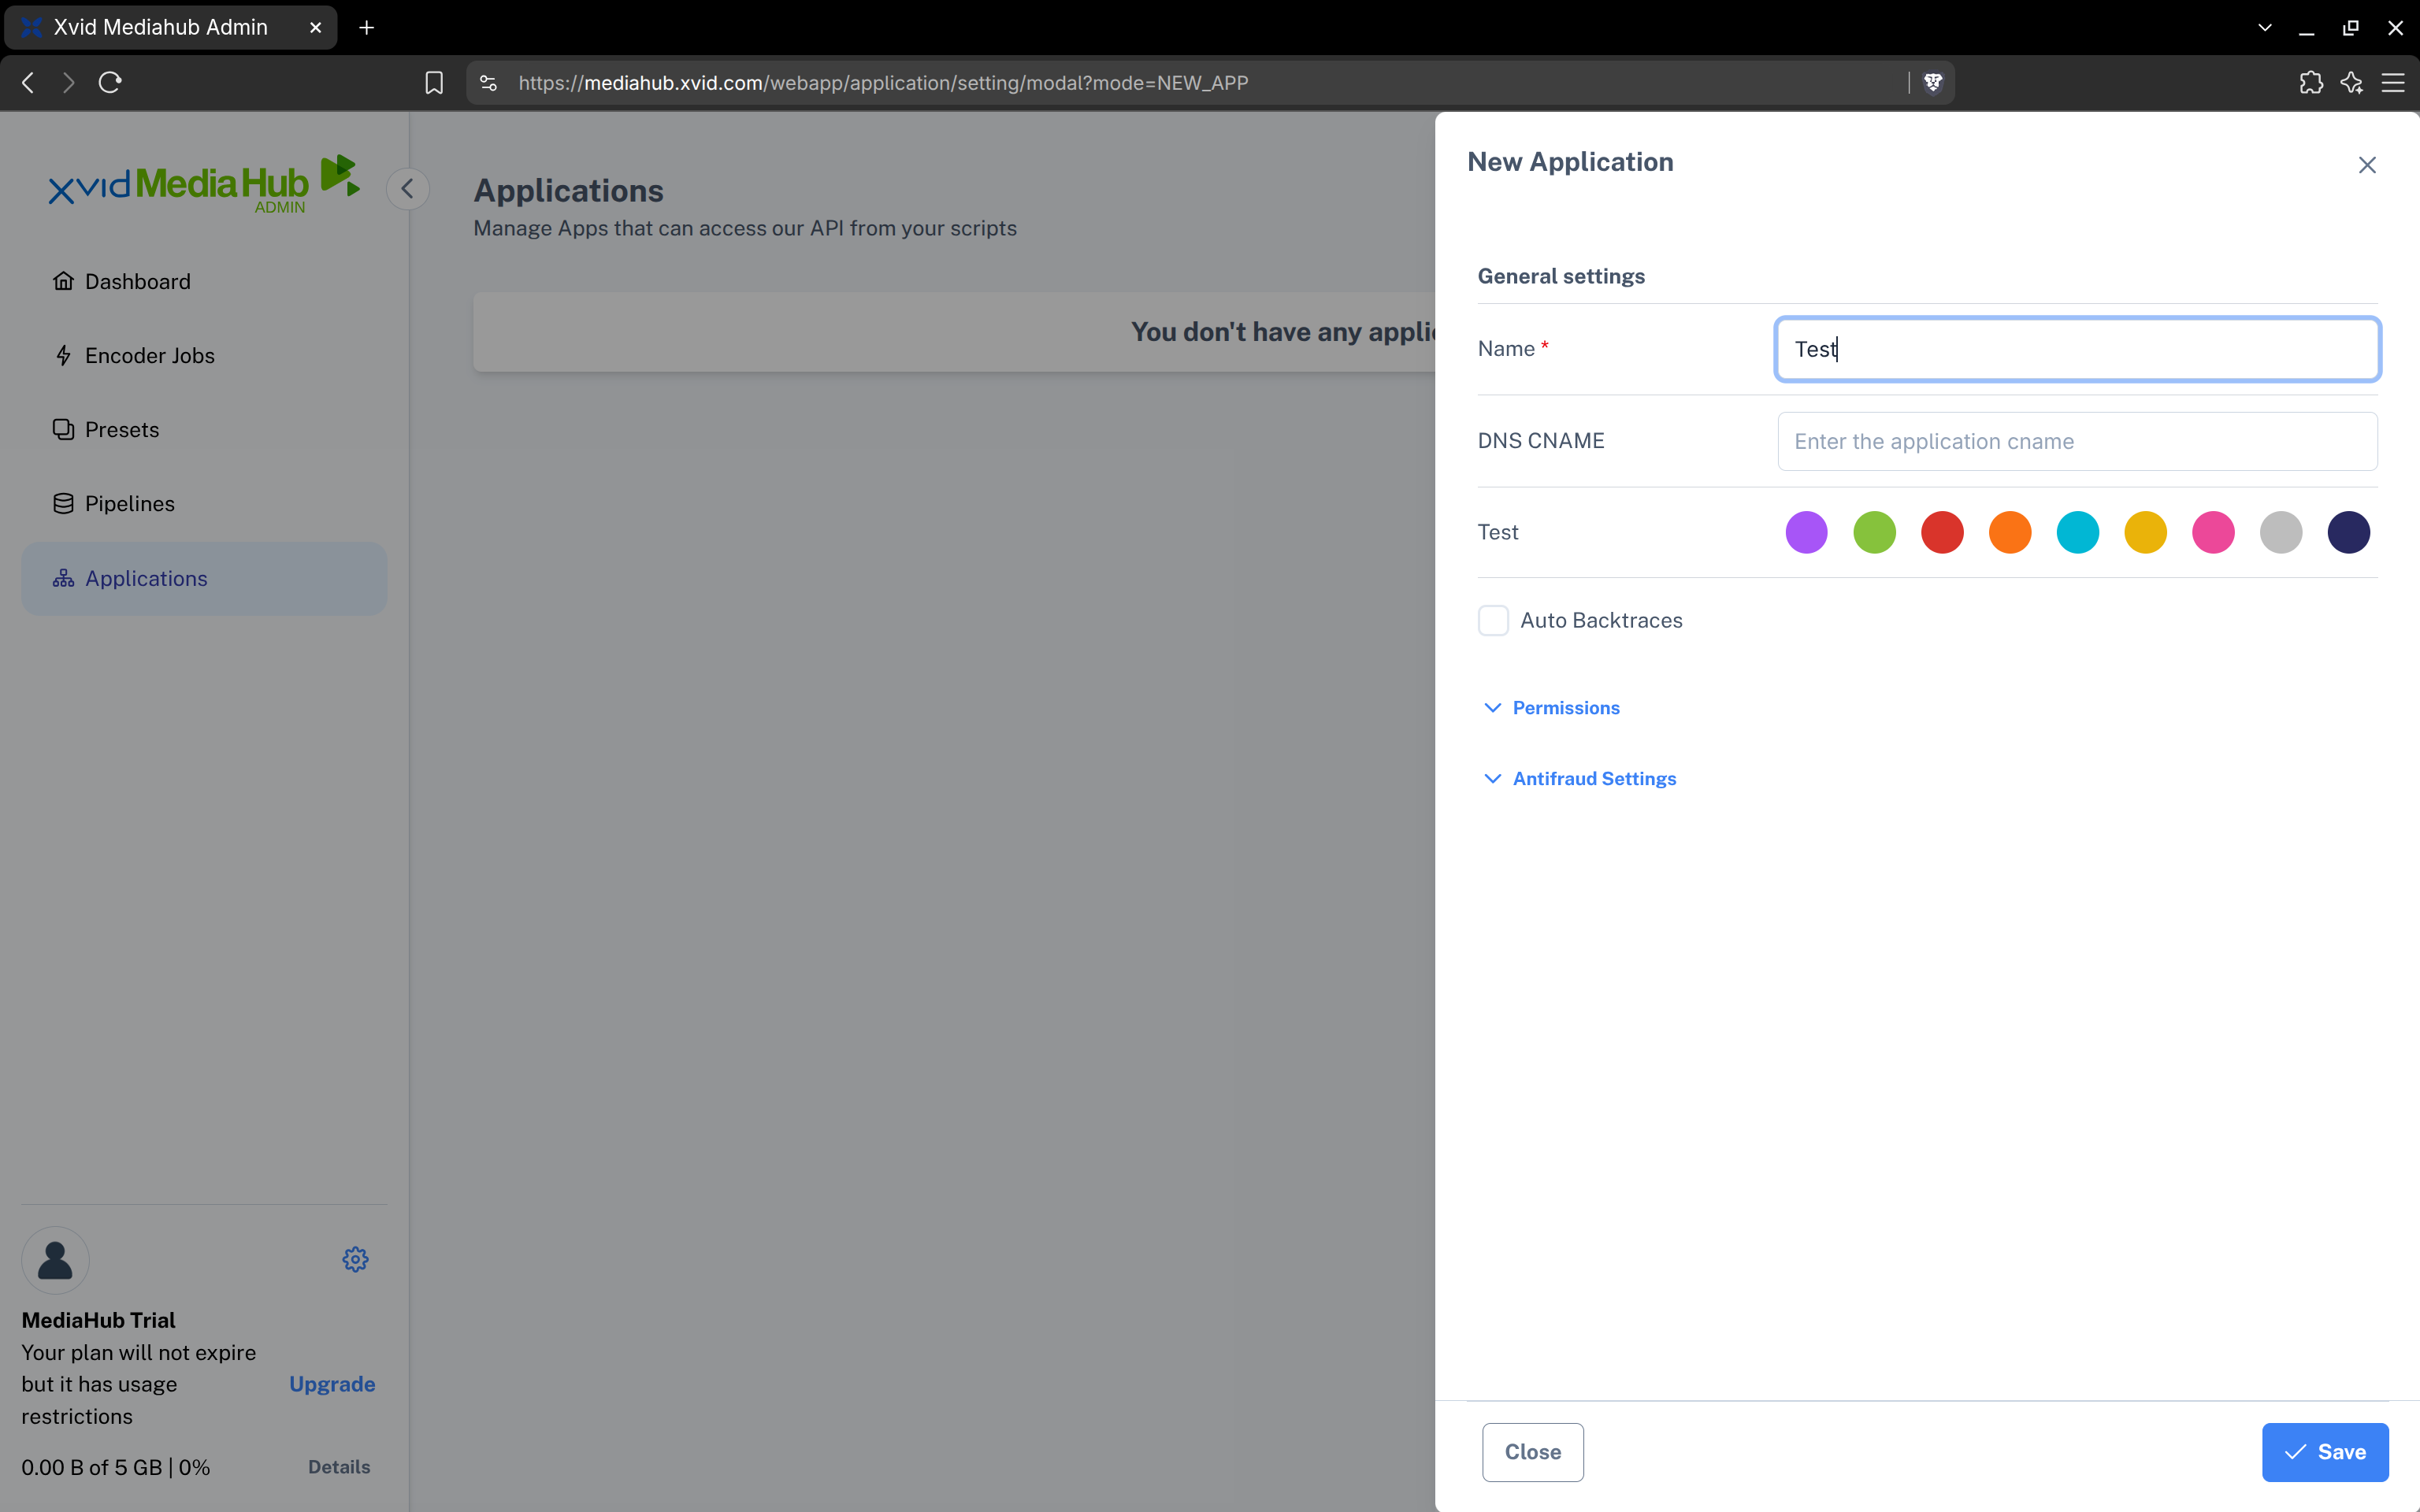
So let's click on "Applications" in the side-bar navigation, then click "Add new Application". Choose a name for your new app and click "Create" (you can just leave the "DNS CNAME" and other fields blank/default):
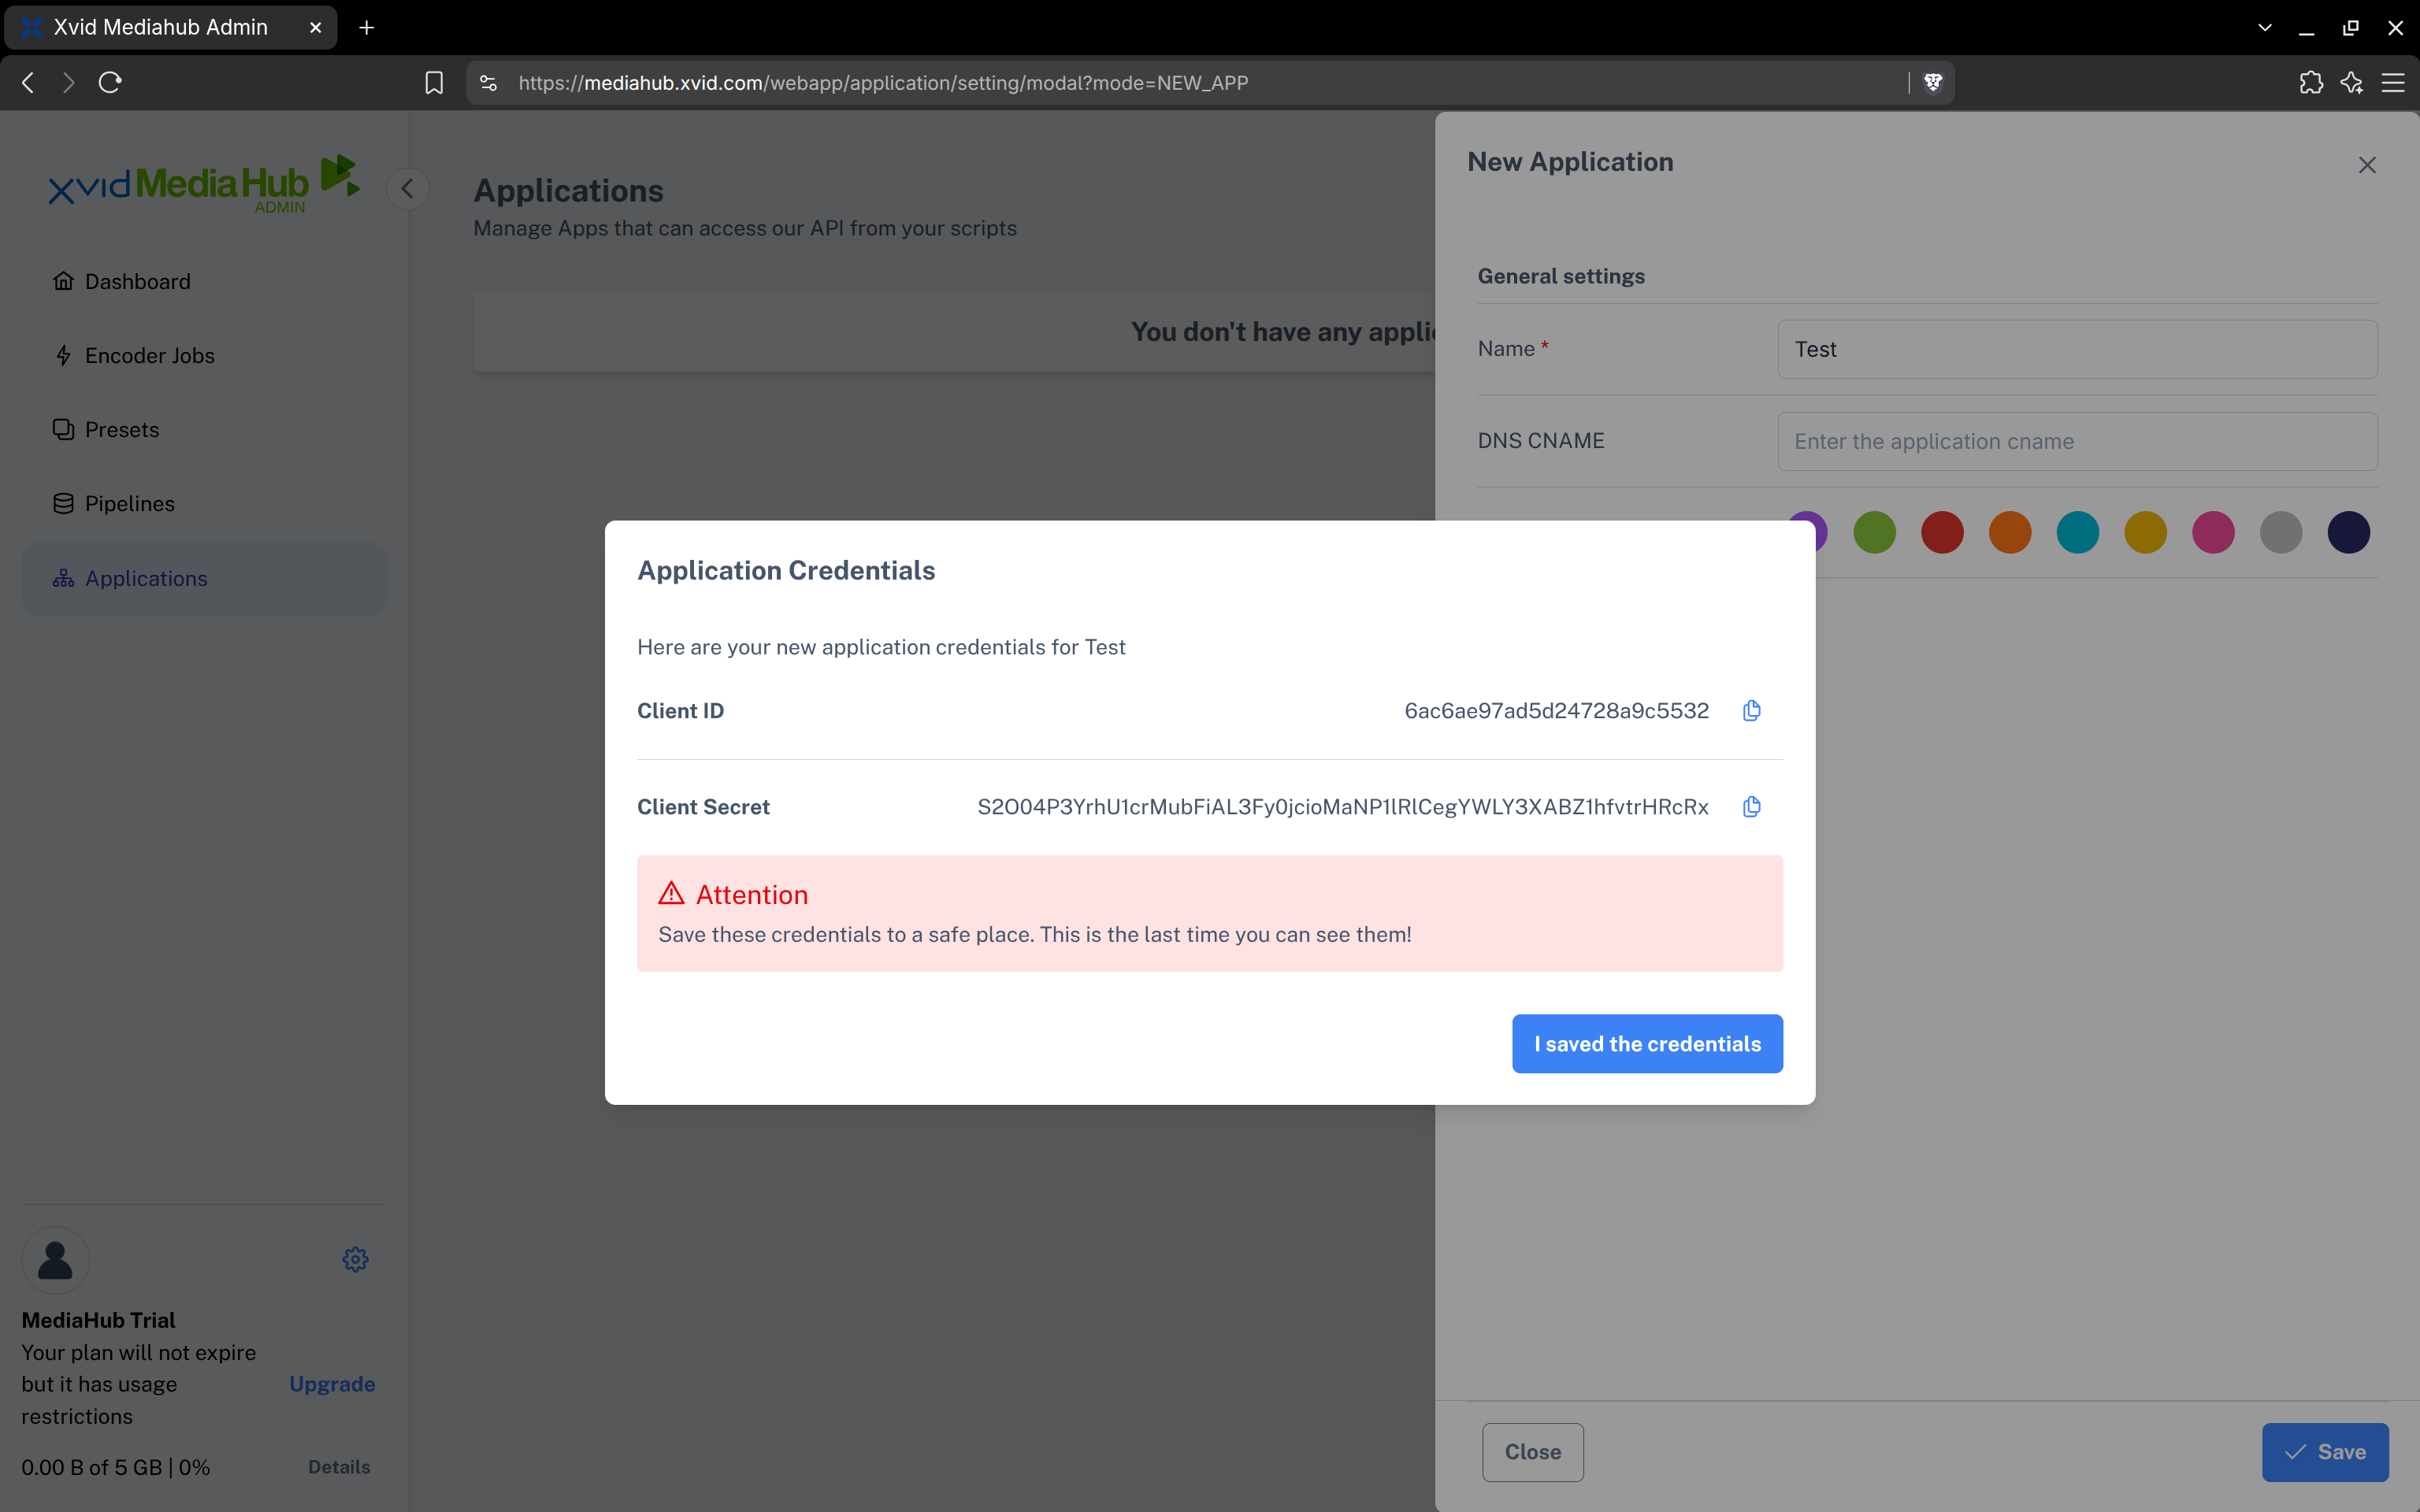
A popup will appear with the application credentials corresponding to your newly created application. In the popup, click the copy icon to copy & paste your Client ID and Client Secret. We'll need them later for generating the AutoGraphed download links:
Step 3: Importing New Video Titles for AutoGraphed Distribution
A job to import and convert a new video title can be launched from the "Encoder Jobs" page by clicking the "Encode a new file" button. The input video can be provided in several ways: Either you upload it from your local computer (might take some time depending on your internet speed), or you provide a (public) HTTP/HTTPS URL referencing your content (useful if your file is already hosted on some web server), or you can also import your video right from your Amazon S3 bucket.
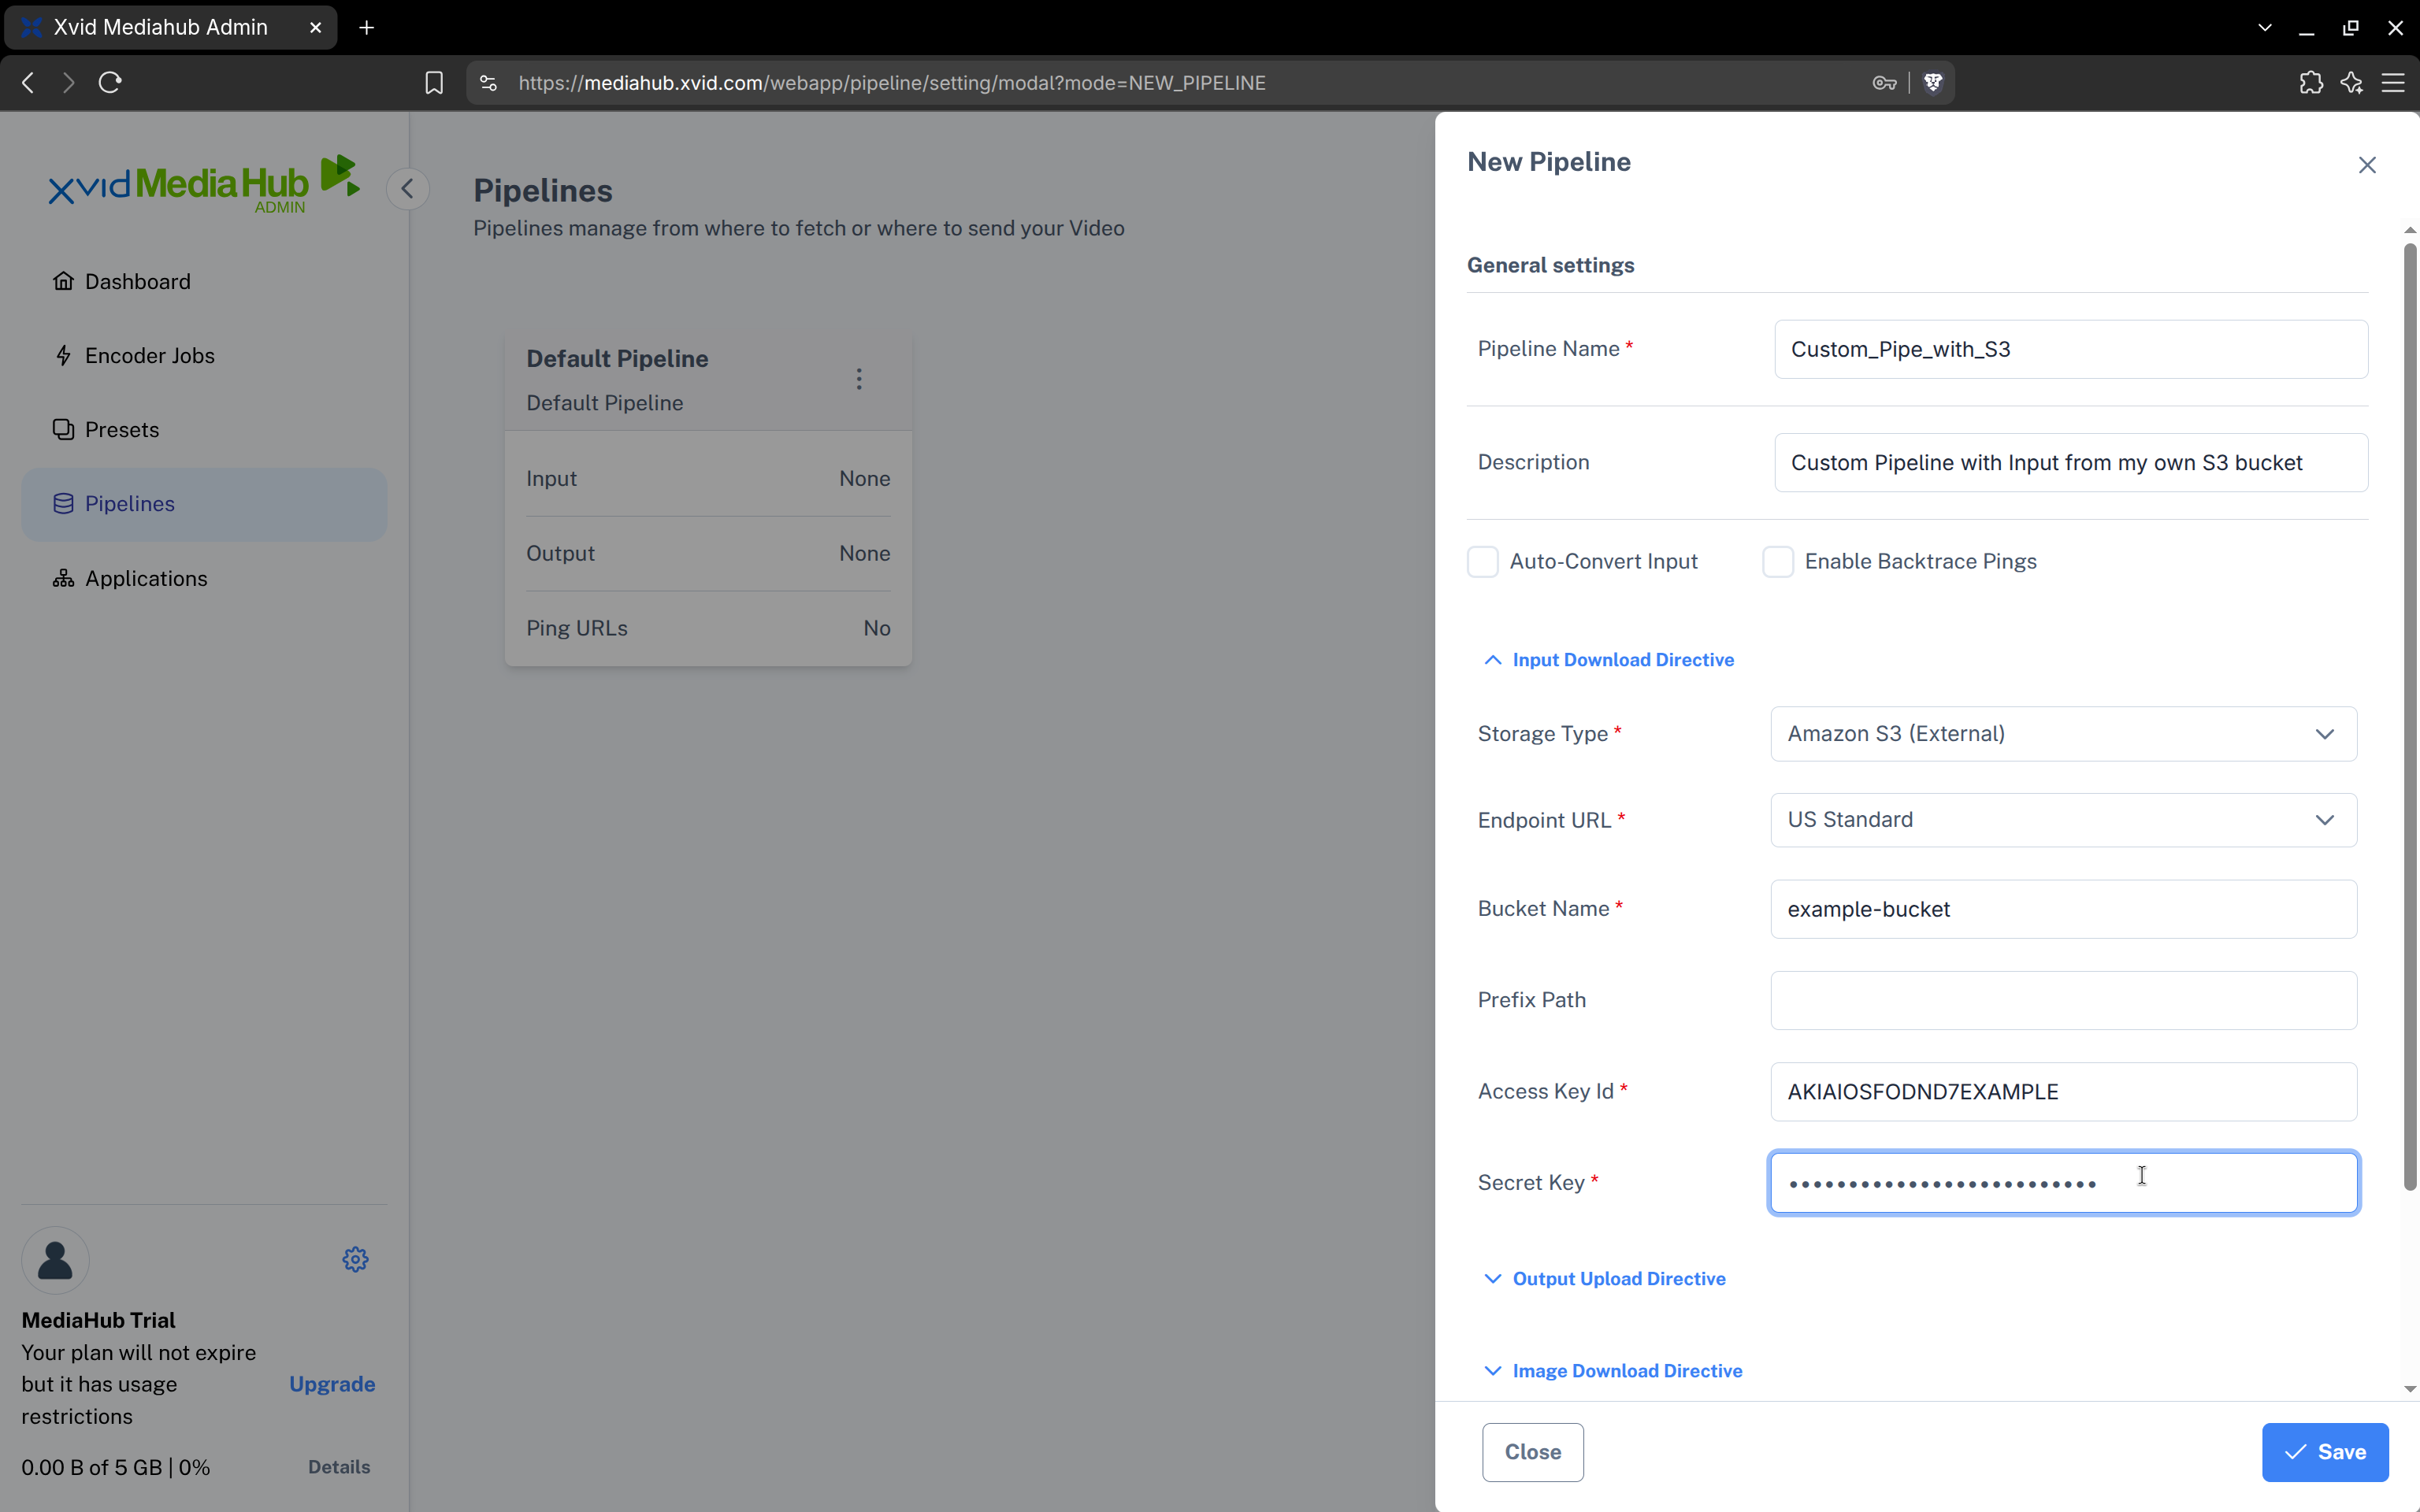
The option to import video from Amazon S3 first requires setting up a custom "Pipeline", where you need to configure the S3 bucket name and credentials from where to fetch your input videos. If you don't want to import video from S3, you don't need to create such a custom pipeline and can skip the following step.
To create a custom pipeline, navigate to the "Pipelines" page, click "Add new Pipeline" and select "Amazon S3" under "Storage Type". Then enter your bucket name, access key and secret key. All other fields (apart from "Pipeline Name" at the very top) are optional and can be left blank or at their default:
Now, to launch the actual video import job, click on "Encode a new file" in the "Encoder Jobs" page and select the input video you'd like to import first (simplest is uploading the input video from the browser - if you want to import from your S3 bucket instead, make sure you select your previously created custom pipeline in the "Choose a Pipeline" drop-down and further click "Enter URL" to enter the object key of your input video as it is on your S3 bucket, e.g. /test_videos/my_test_video.avi):
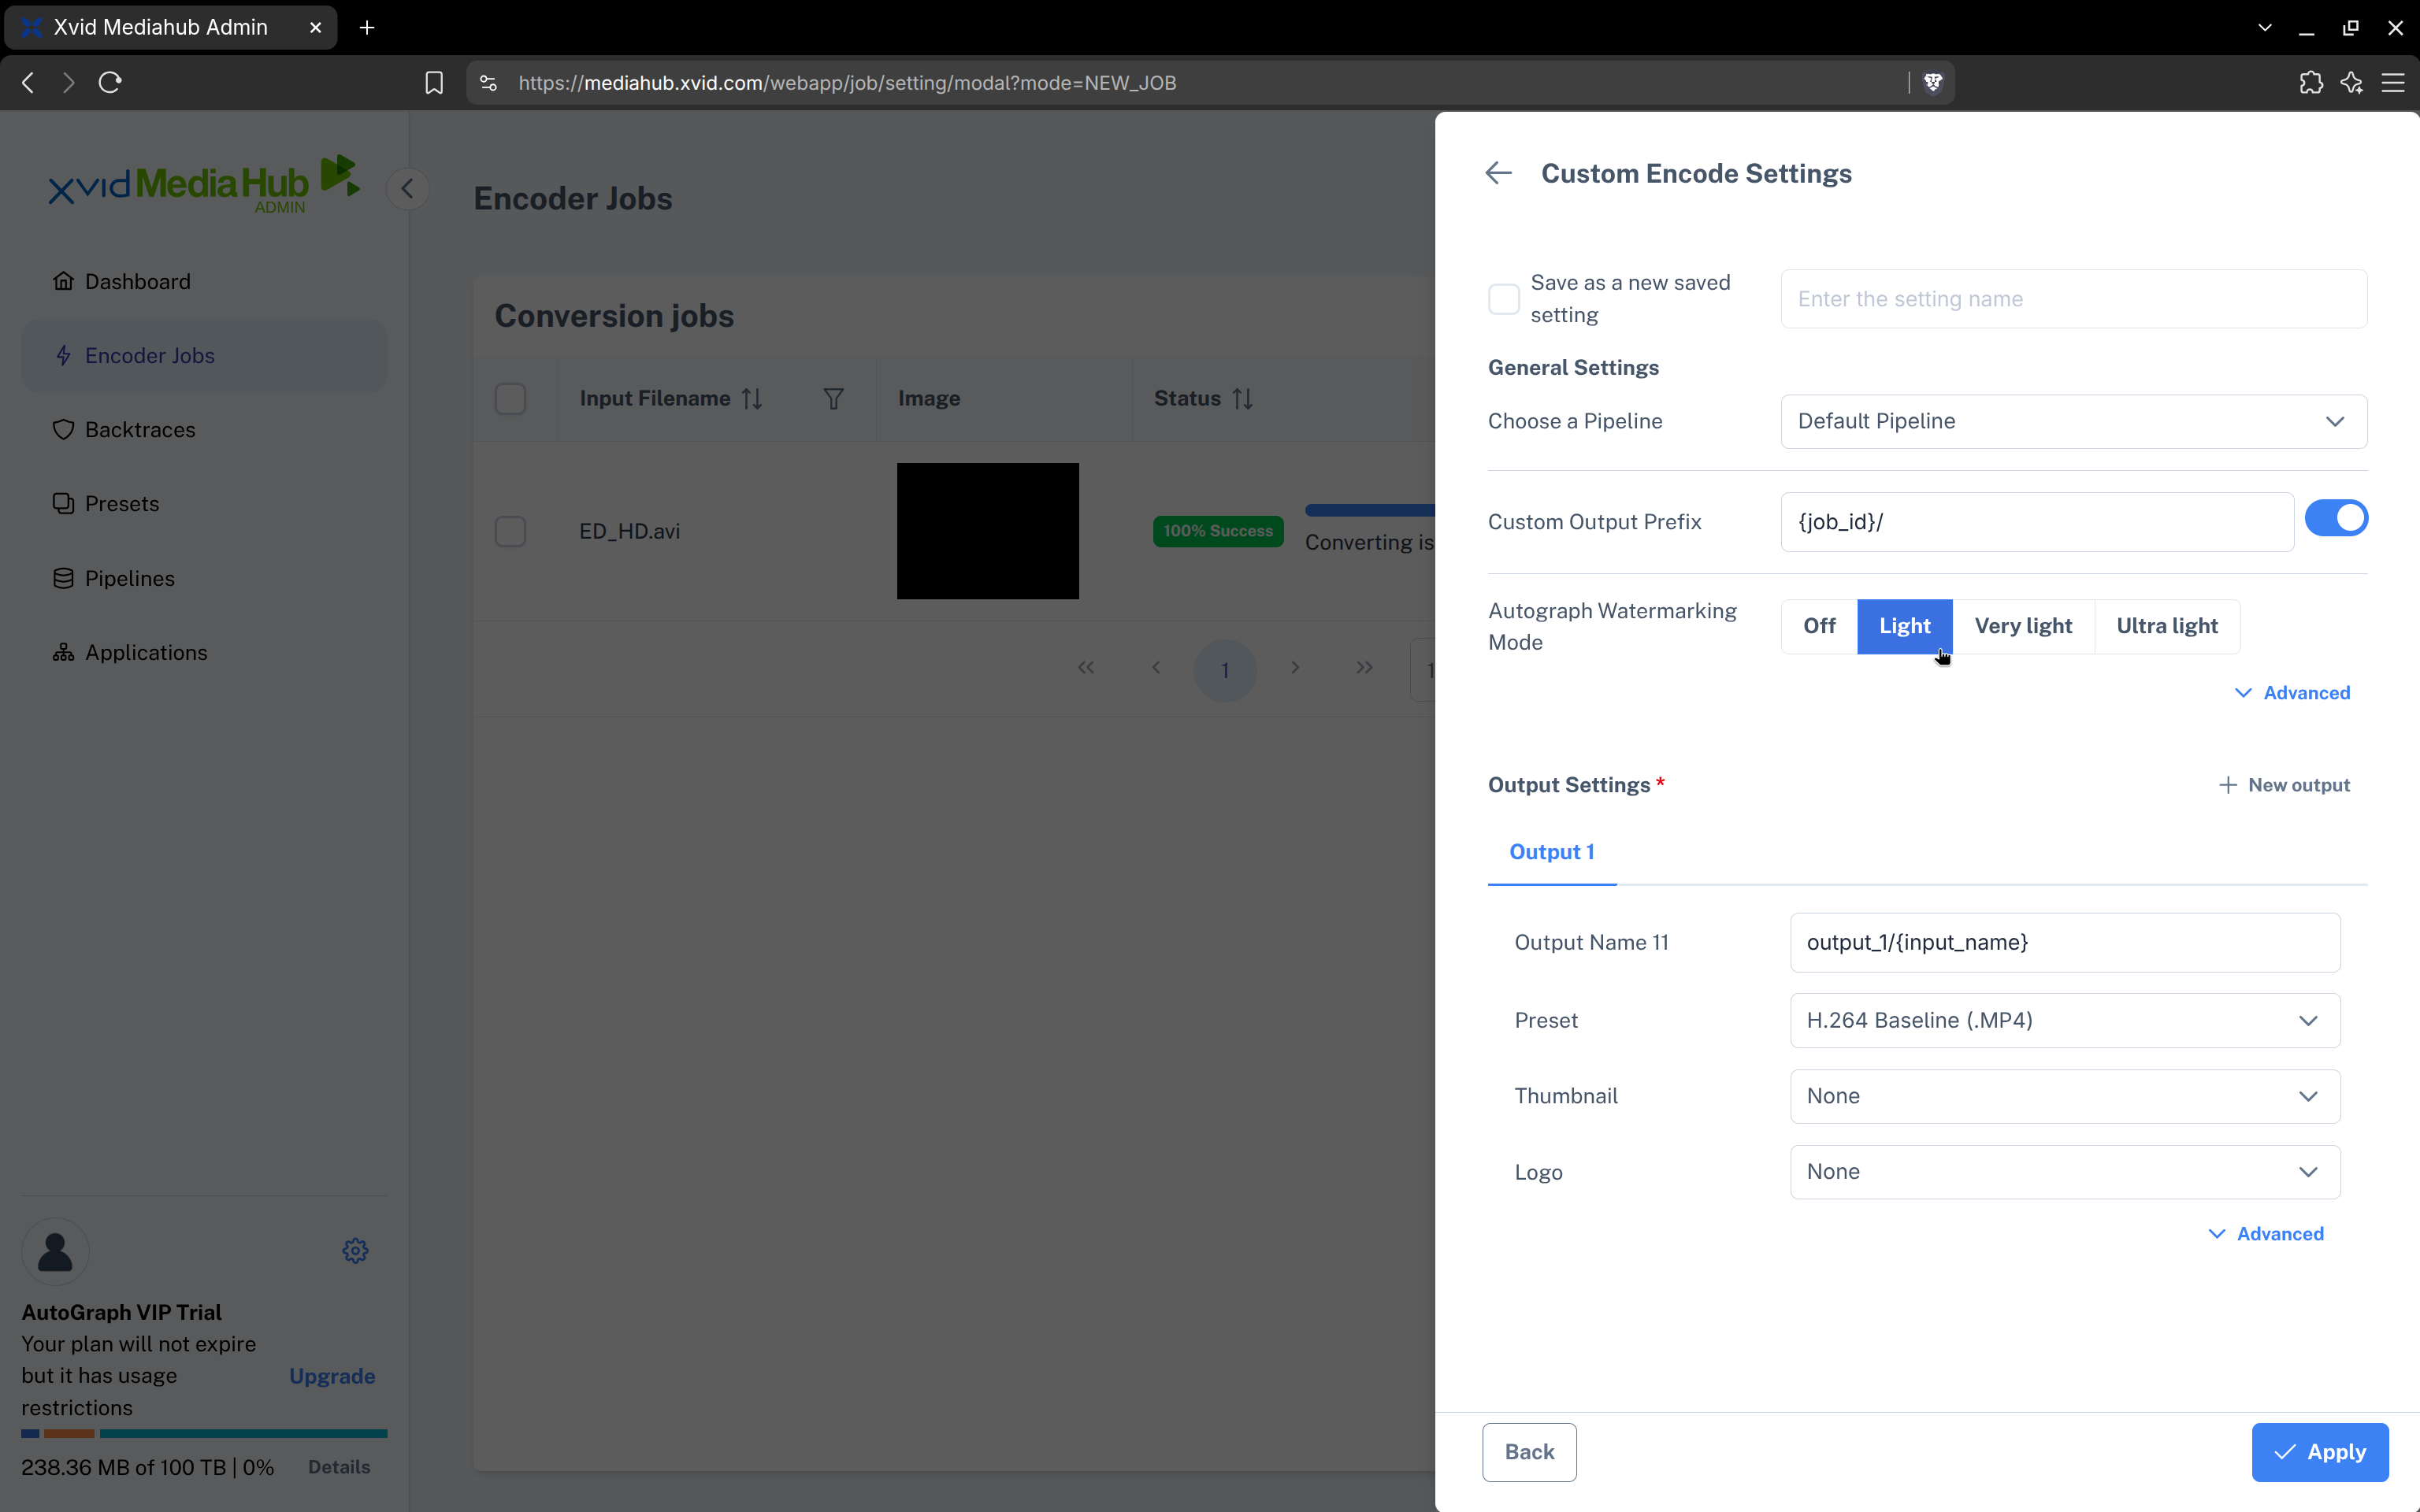
To have your imported video AutoGraph-distributable (so to be able to generate uniquely tagged and watermarked copies per user), you must choose a watermarking mode other than "Off"! So make sure you have e.g. "Light" or "Very Light" selected before pressing the "Start Encoding" button...
Output and Advanced Output Settings
At the bottom of the "Custom Encode Settings" dialog you'll find "Output Settings". This specifies the video/audio output format and the filename that the AutoGraphed copies will be having. Currently, various MP4 flavors are supported (Baseline and High profile at 720p, 1080p and 4K resolutions). The MP4 presets are good for download as well as for HTML5-based video streaming. The MP4 output presets will in addition also automatically support MPEG DASH and HLS streaming without further ado.
You will typically want to decide between two presets: Use the "H.264 Baseline (.MP4)" preset for everything at 720p resolution or below and where maximum compatibility to the widest range of video playback devices is most important to you. Videos created with this preset will play in the browser and on mobiles, tablets as well as low-end desktop computers. The "H.264 High (.MP4)" preset should be used for all 1080p resolution content, and it can further also be used for lower-res content where maximum compression (but not the absolute maximum playback support) is the main concern. There is also an "H.264 UHD 4K (.MP4)" preset specifically for 4K resolution content.
After choosing one of the presets, you'll also need to define an "Output Name" for your video. This is the filename by which end-users will later download the watermarked copies.
WARNING
Please enter the output name without a file extension! The right file extension is appended automatically based on the chosen preset (so the MP4 presets will add the proper ".mp4" extension automatically).
In addition to the settings mentioned, you also have the choice of specifying some further "Advanced" settings for the conversion process. It is optional though, and you don't really need to bother about them. But let's take a look at the advanced settings nonetheless:
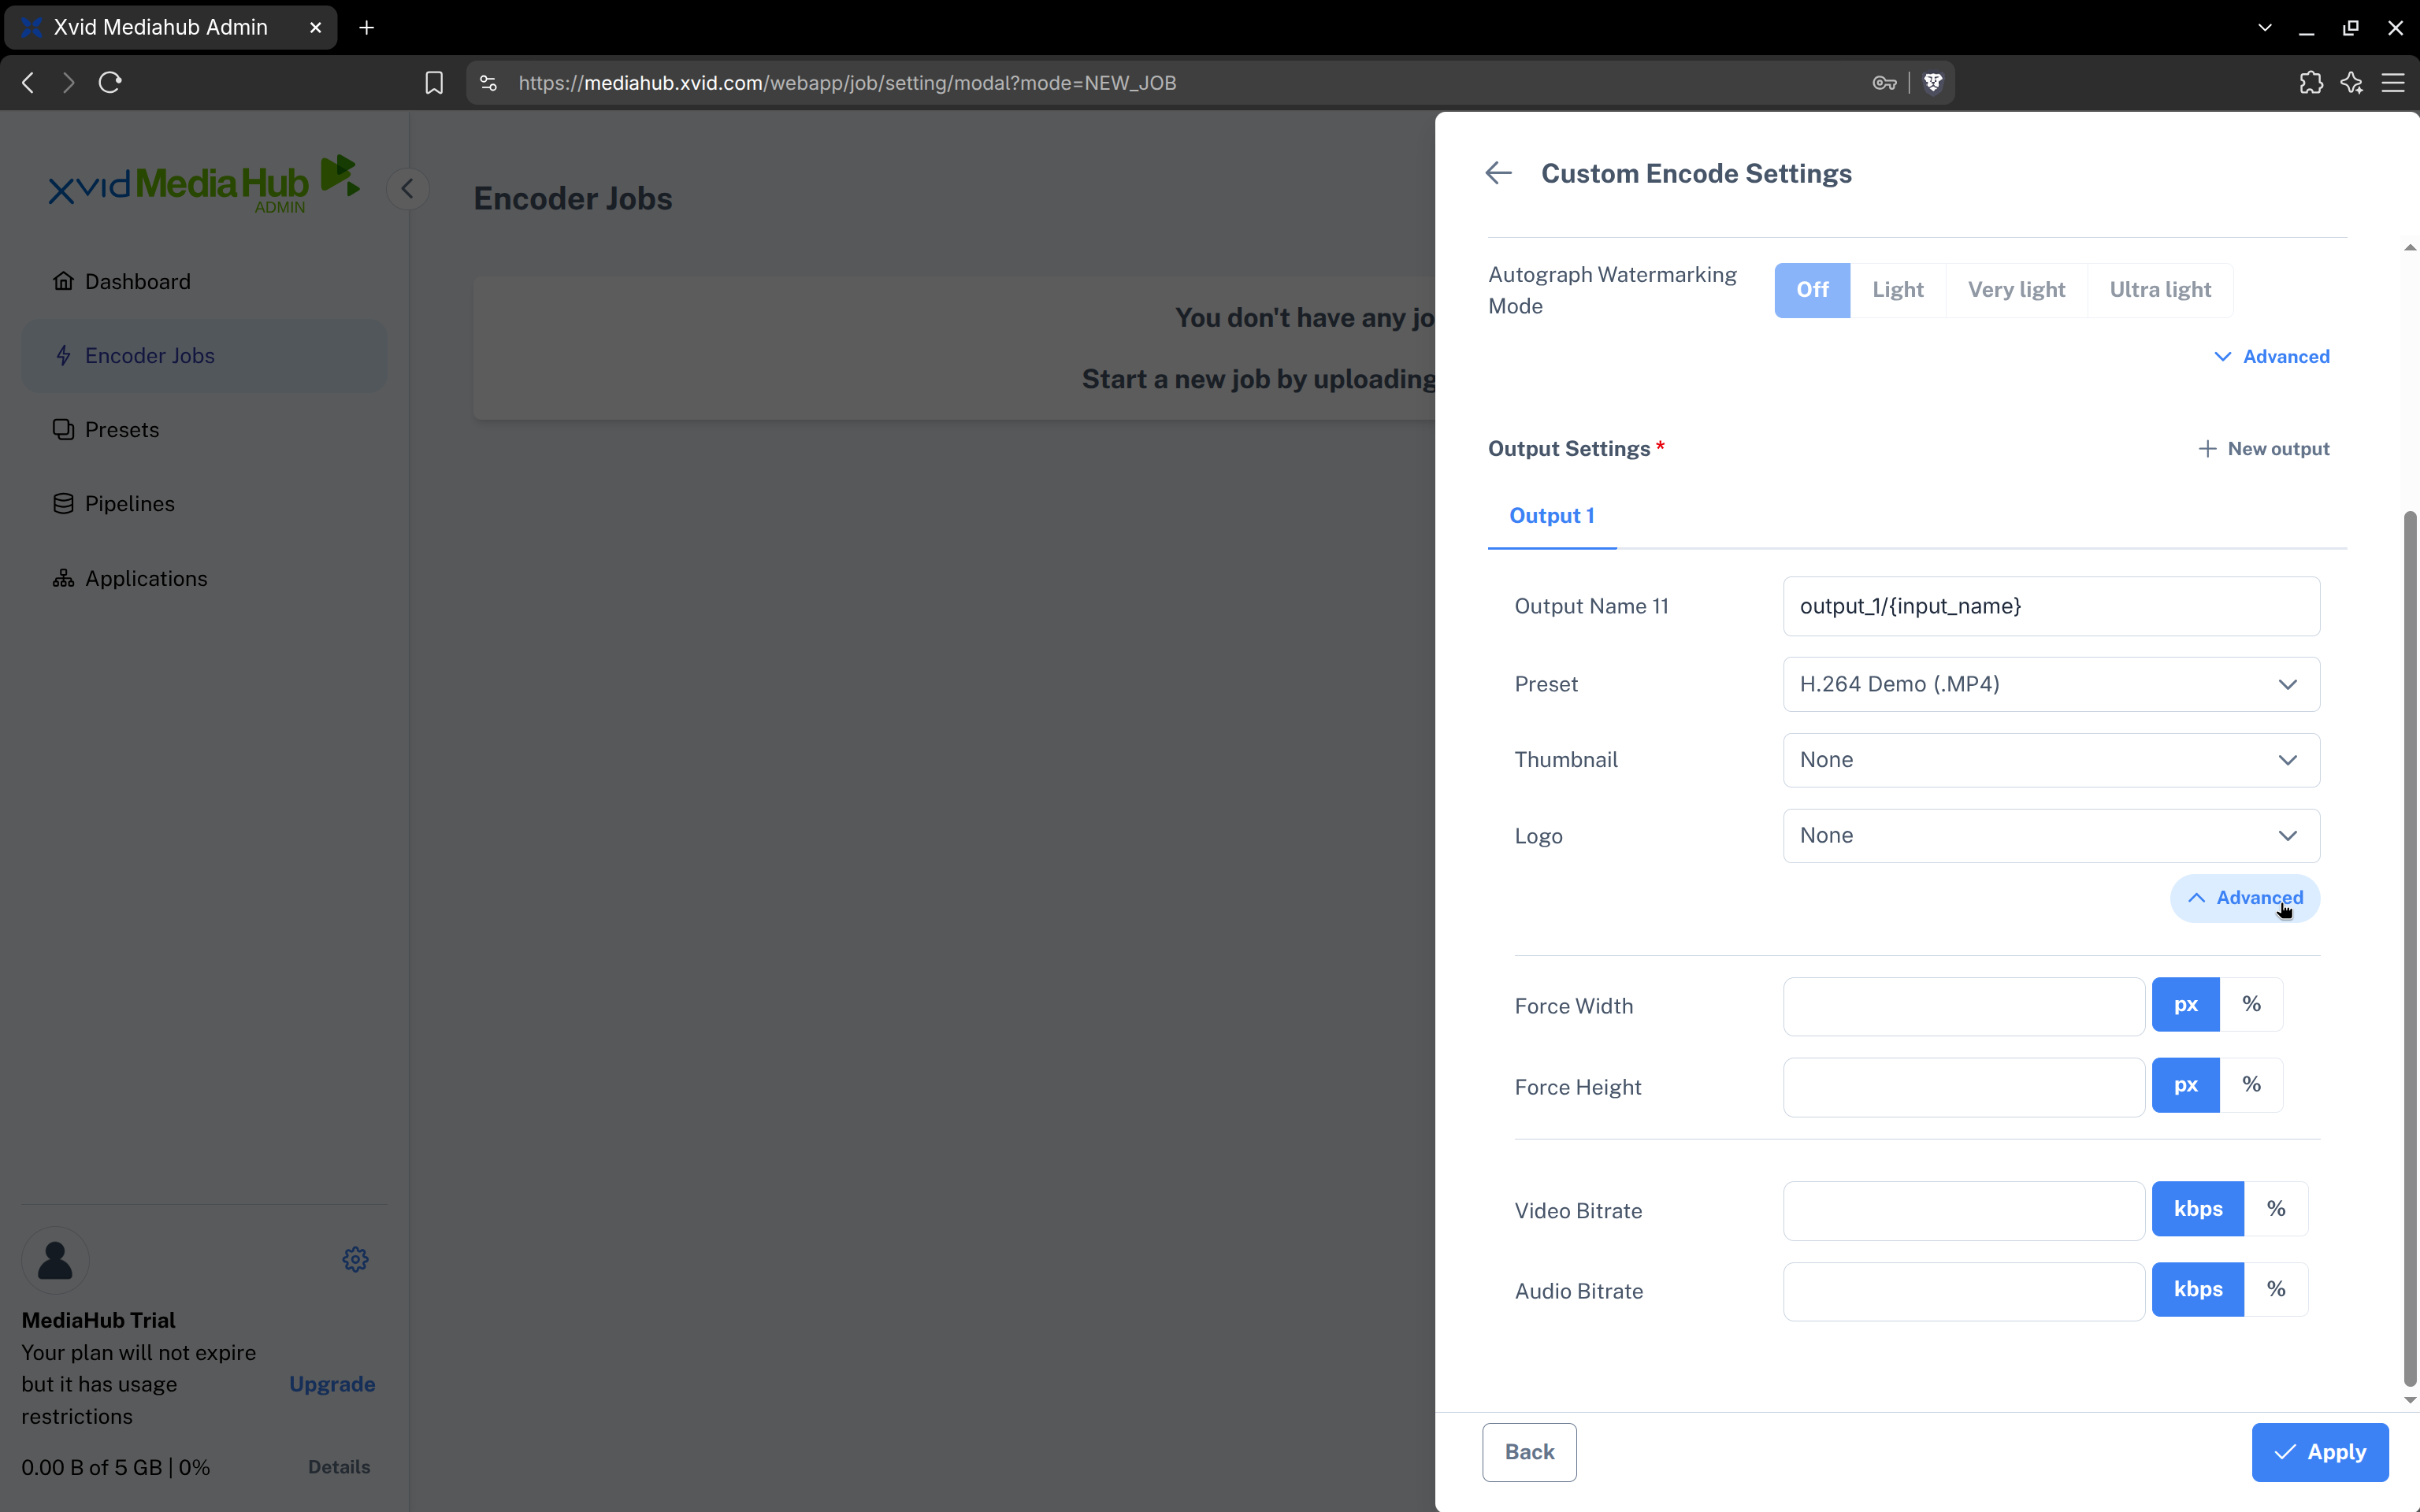
Most noteworthy are the "Force Width" and "Force Height" settings. If you leave these fields blank (that's the default), then your video will be imported at the same resolution as your original input video. However, often you may want to provide also lower-resolution versions of your content. In this case you can run the import job with an output where you force a lower resolution. So you could enter "720" into "Force Height" and force the video resolution to 720p (1280x720 pixels). (Assuming the input video is 1080p, this will yield a lower-res 720p version of the input.)
There's also an option to force the bitrate at which the video shall be compressed. If you leave this empty, the video will be converted automatically at a bitrate that is a good trade-off between quality and filesize and that typically suits well for web distribution. So it's usually safe to just keep this at its default (so no need to specify anything), and you should force a value here only if you know what you're doing...
Once you're satisfied with your settings, just click the "Apply" button (again, be sure you have chosen e.g. "Light" or "Very Light" as the AutoGraph watermarking mode). Your video will then be scheduled for import, and you can see the progress in the jobs table. Once the import has completed successfully (this will take a while!), you'll see a "Info" icon next to it in the jobs table. Clicking on it will allow you to download a "master copy" of the content with which you can check whether everything went well for the import and if you're happy with the quality of the video (if not, you may launch a new job with different encoder settings).
Step 4: Figuring Out the File ID
Upon clicking the "Info" icon next to your newly imported video in the jobs table, a slideout dialogue will display further details about the encoded video and the master download link. Under the output name you'll also find the FileID, which we need for generating the watermarked download links for video distribution:
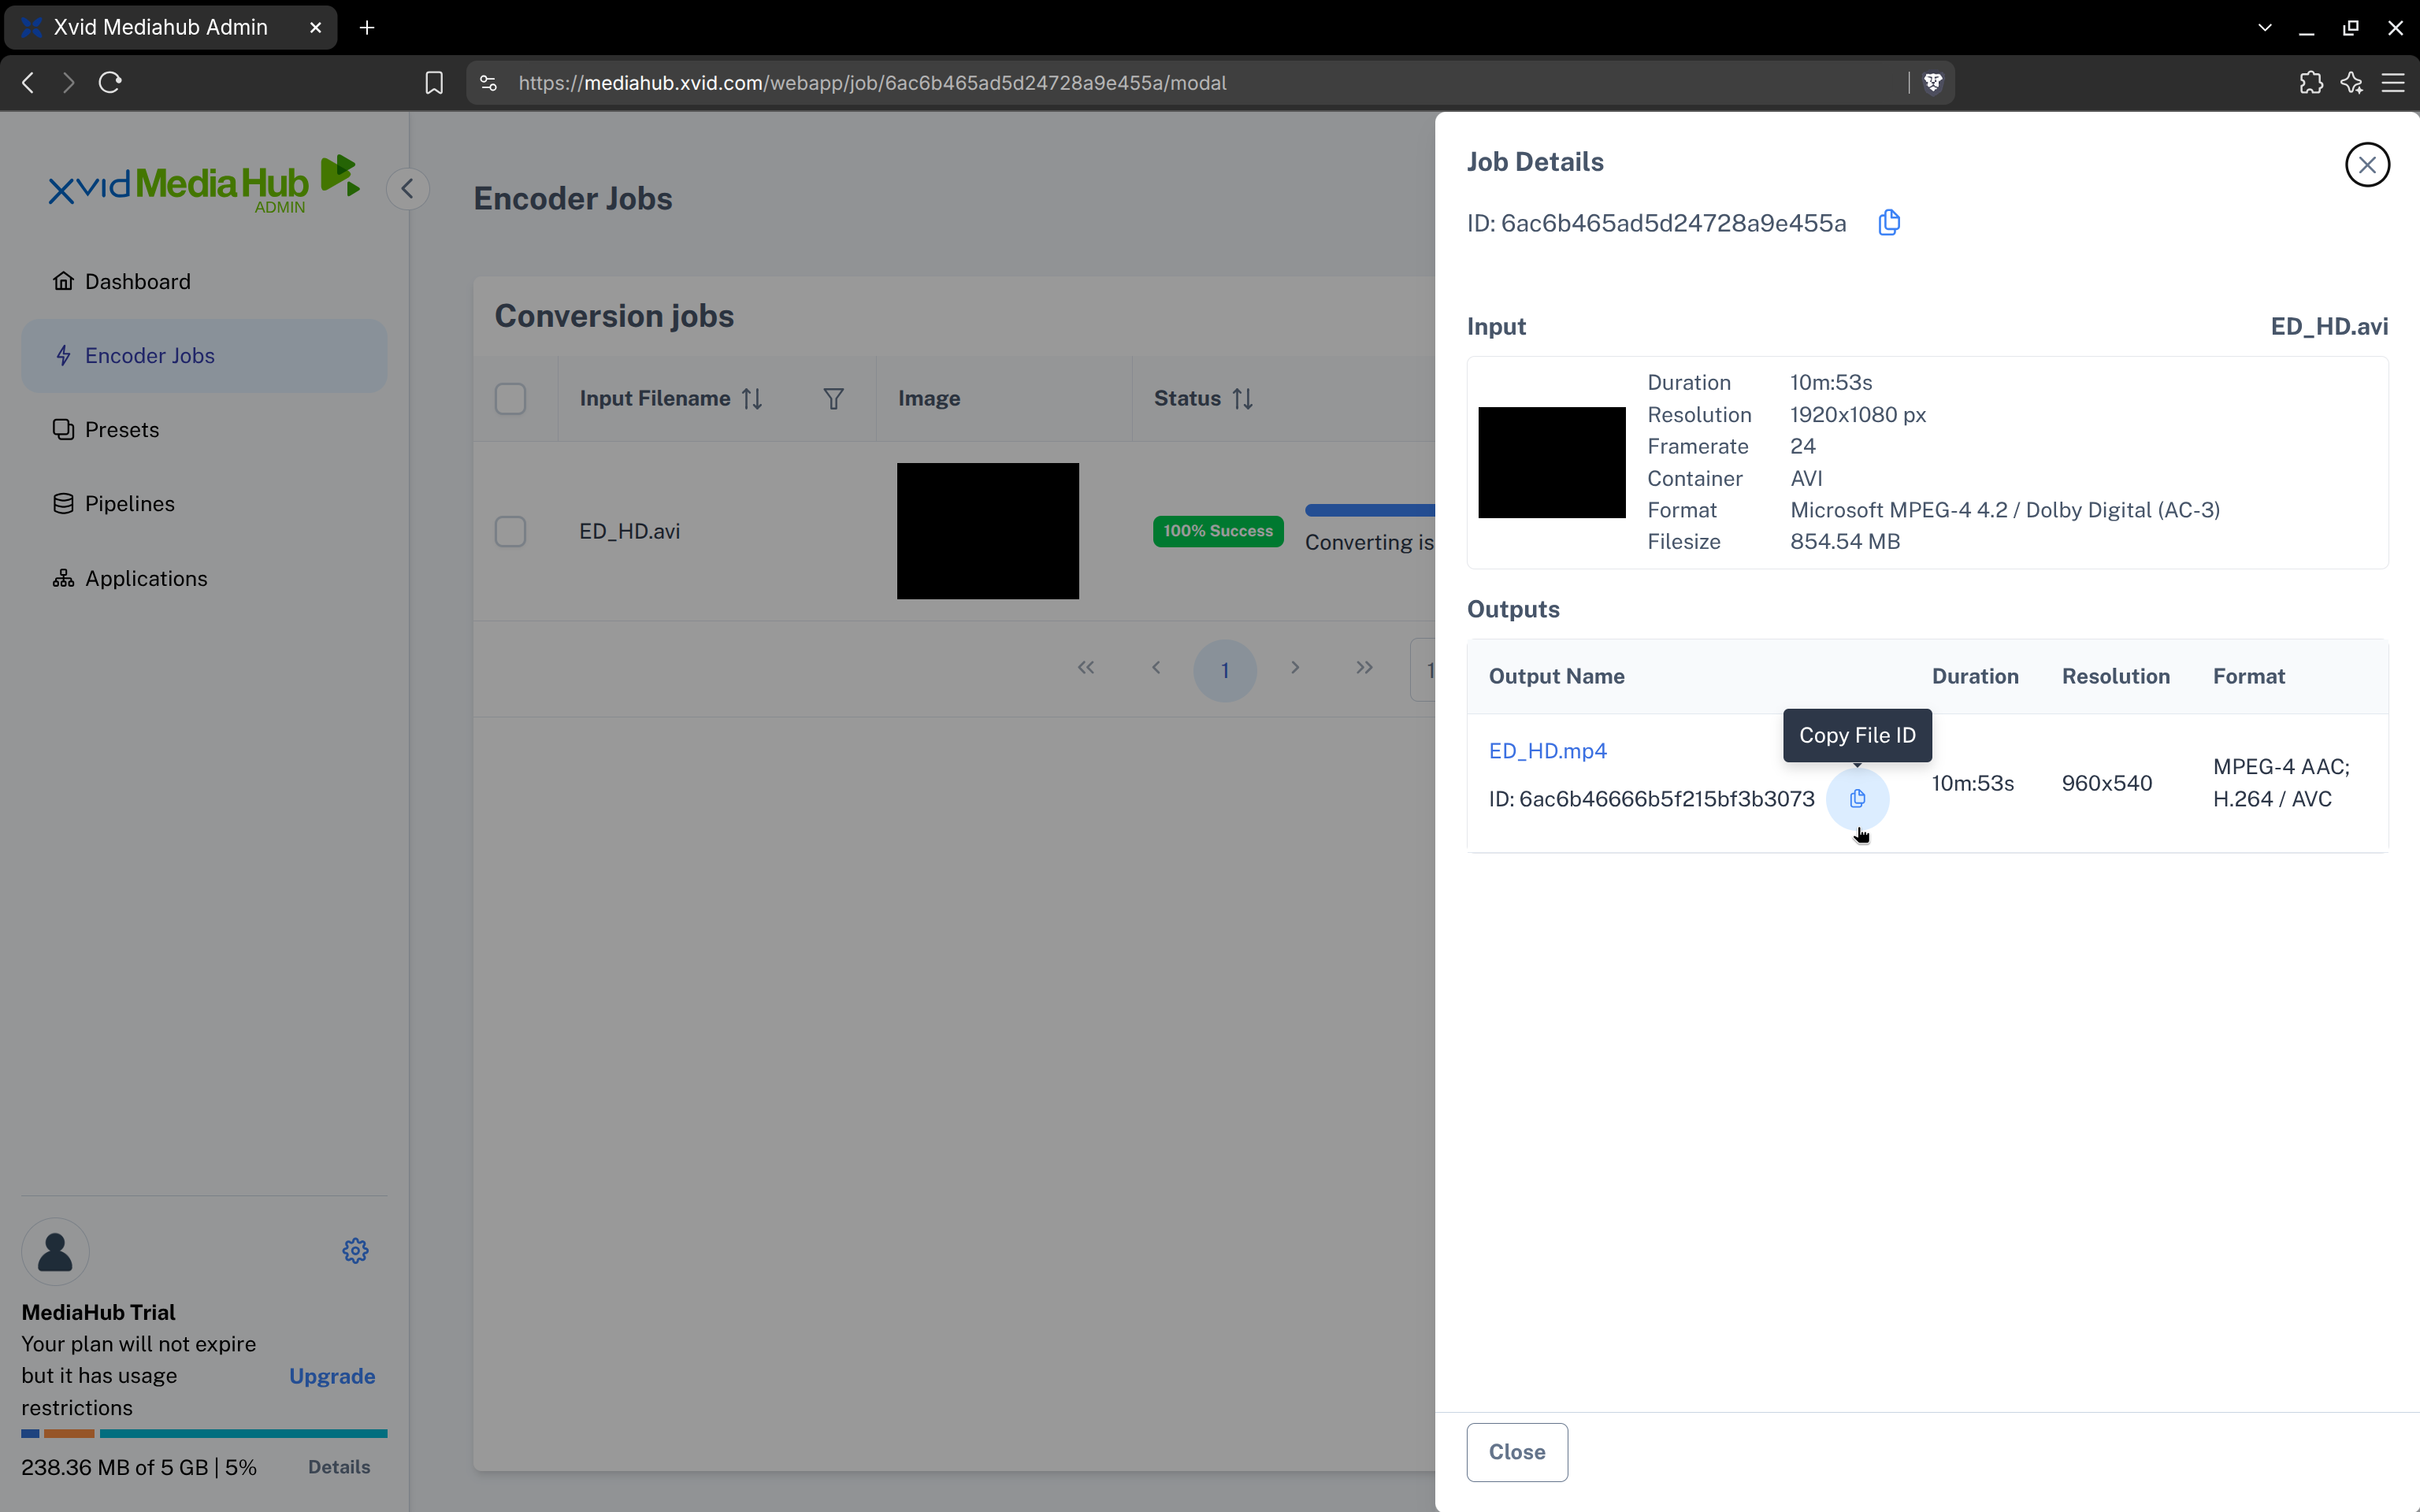
So let's note down this FileID for later use. You can just click the clipboard icon to copy & paste it (make sure you keep the complete ID — it should consist of 24 characters).
Step 5: Generate the Individual Download Links for Your Watermarked Copies with a Python or PHP Script
Now let's finally create an individual, watermarked download link for our video using one of our example scripts.
The top of the script has a "Configuration" section, which sets up some important constants. Relevant are mainly just the CLIENT_ID / CLIENT_SECRET variables. Make sure you correctly copy & paste your client_id and client_secret that you obtained in Step 2 above into the script.
With the above done, the Python link generator script can then be executed like this:
text
$ ./create_autograph.py
Usage: create_autograph.py File_ID Tag Validity

Parameters:
    File_ID (hex) - ID of AutoGraph Master Video File
    Tag (string)  - Message/Tag to embed
    Validity (s)  - Number of seconds until the generated download link expires

Example: ./create_autograph.py 6bf3456ed18f734ab4c01f25 1234567890 3600
The PHP script can also be invoked from the command line in a very similar way as the Python script:
text
$ php -f ./create_autograph.php
Usage: php -f ./create_autograph.php File_ID Tag Validity

Parameters:
    File_ID (hex) - ID of AutoGraph Master Video File
    Tag (string)  - Message/Tag to embed
    Validity (s)  - Number of seconds until the link expires

Example: ./create_autograph.php 6bf3456ed18f734ab4c01f25 1234567890 3600
Both scripts take three parameters:
- File_ID — specifying your imported video file, as explained above
- Tag — the "identifier" you want to watermark into the video copy, e.g. a user_id in your system or a transaction id within your shop etc.
- Validity — the number of seconds that the generated download link shall be valid before it expires
Example:
text
$ ./create_autograph.py 5463456be4b006712659301b secretid_123 3600If all goes well, it will return an HMAC-signed download link that will be valid for one hour (= 3600 seconds) and which you could directly share with your respective end-user (so the user which you have associated/linked with the "secretid_123" Tag that's watermarked into the video):
text
https://autograph.xvid.com/downloads/?file_id=546e69b11c521fb38cf7e5c1&autograph_tag=secretid_123&redirect=true&multi_use=true&client_id=15704f19d8d3d4bc3aa0e068&expiry_time=1416755619&signature=e93323adf01d52ece9e2a7c9545225a2130f7a91e93323adf01d52ece9e2a7c9WARNING
The above link and the ones used in the examples below will not work — they are just for demonstration purposes to show how the returned download link should look like. Just replace them in the examples with the link you created yourself.
You will notice that the link generation is a very fast process requiring virtually no CPU power, and it can be performed totally offline without an internet connection to the MediaHub API being needed. Therefore, the AutoGraph link generation is very easy to integrate into an app or website. E.g., if you run a website distributing premium video available only to certain users (e.g. those who purchased a membership), you can just authenticate your users as normal and then call the AutoGraph link generation function every time a user clicks on the download button. Simply use the user id or username of the logged-in user as the Tag and you're done. Every user will get their own individually AutoGraphed video copy, and each copy you hand out will be distinguishable and traceable to the original downloader!
You can then use the generated link either to offer the file for download (simply making it an <a href=""> download link) or to stream the video in an HTML5 video player, e.g. using the <video> tag (or any other fancy HTML5 JavaScript player — just make sure you enable HTML5 mode and not Flash in the player!).
Download Link
html
<a href="https://autograph.xvid.com/downloads/?file_id=546e69b11c521fb38cf7e5c1&autograph_tag=secretid_123&redirect=true&multi_use=true&client_id=15704f19d8d3d4bc3aa0e068&expiry_time=1416755619&signature=e93323adf01d52ece9e2a7c9545225a2130f7a91e93323adf01d52ece9e2a7c9">This is a test Download!</a>Video Player
html
<video width="320" height="240" controls>
  <source src="https://autograph.xvid.com/downloads/?file_id=546e69b11c521fb38cf7e5c1&autograph_tag=secretid_123&redirect=true&multi_use=true&client_id=15704f19d8d3d4bc3aa0e068&expiry_time=1416755619&signature=e93323adf01d52ece9e2a7c9545225a2130f7a91e93323adf01d52ece9e2a7c9">
  Your browser does not support the video tag.
</video>
So that's it already! To automatically generate the right download links for your users, you may just copy & paste the PHP sample code into your site and call the get_signed_download_link() function from wherever you want to embed a watermarked download link on your site.